Sunday, July 28, 2013

Budding Romance Printable With Paper Clip Binding And GIVEAWAY!


Okay everyone...my printable mini is ready!!!! Check out my YouTube video above. You can purchase this at my Etsy Shop. But here is even better news...I'm doing my first ever giveaway!!!! All you have to do is follow my blog....that's simple, right?!?! On Saturday, August 31 I will randomly pick a winner and you will receive the mini album I showed in my YouTube video! Don't want to wait that long to get yours? Then you can purchase this mini at my Etsy shop, Ellie's Albums & More for only $10  $7. And it's an instant download. You can purchase and make this right now! I'm so excited about this, I hope you are too. Please enjoy! And feel free to leave me any feedback.


Thanks for stopping by!


Pinspiration Sunday: Lacey Table Top


I bought a coffee table last summer from a yard sale for $10. I bought it knowing that I wanted to re-do it. It has this inlet that I was planning to fill in with tile or something…however, my lil’ tot likes using this table to hold his snacks….and my husband liked it too. So on to plan B. I got this idea from the ladies over at A Beautiful Mess…once again, I’m in love with their creativity! But this table having the center set down in made it a little tricky…but I think it turned out okay anyways. 

Here’s what I used:
Wooden coffee table ($10 yard sale find)
Electric sander (already owned)
Windex and paper towels (cleaning supplies)
White primer
2 different sized paint brushes and a small paint roller
Cream colored spray paint (got at Lowe’s for less than $4)
Brown latex paint (had from when we moved into our house and painted)
Sealant (already had from other projects)
Tape
Lace (25 cents from yard sale)


So first thing first….time to sand this table down…well at least the parts that could fit the sander.

Then I cleaned it with Windex and paper towels…somewhere on the internet I read that you should clean it with Windex.


Next I primed the entire table and allowed it to dry.


Then I painted just the inside top brown and allowed it to dry.

Then it was time for the lace…it was hard to pull the lace taught so I had to not only tape around the top edge but I had to make doughnuts along the inside edge to keep the lace as close to the surface I wanted painted. 

Then I spray painted over the entire lace covered area.


 I took the lace off immediately after I sprayed so that it wouldn’t stick to the table.
When you look closer at the table you can see that the edges are kind of fuzzy…like out of focus, that’s because the lace wasn't as close to the table surface…but I kind of like that effect.


Next came time to paint the rest of the table.  I used a roller for most of it to get a nice, smooth, even finish. I used a small brush in the corners and in areas where there were gaps in the wood pieces.

I allowed it to dry overnight. The next morning I applied a spray sealant and allowed that to dry…and it was done!


As always, thank you so much for stopping by!


Friday, July 19, 2013

Revamp~A~Lamp

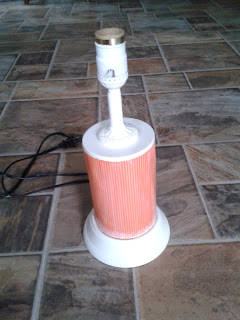
Hello. My name is Ellie and I'm an Elvis fan. With that said...you should know that I don't want to own all the cheesy memorabilia there is out there. And this lamp was....C-H-E-E-S-Y! But I will say that when my grandparents-in-law purchased this, they thought they were doing something really sweet and I totally appreciate it...however, this lamp spent about a year in a box...then made it to my craft room and now it is a craft project...it is time to revamp this lamp!


So here's how I did it. First I taped off the socket and cord using masking tape and a plastic shopping bag.


Next, I sprayed the entire lamp with a white primer.


I was originally going to spray paint the lamp with that famous La Fond Copper spray paint I've been using so much lately but I really hadn't realized that the lamp was textured...the words were raised! Ugh! So on to plan B. In came my good friend Mod Podge. And I had this prefect scrapbook paper too!


I love this cute little detail!


I covered the lamp with the Mod Podge and wrapped the paper around it. Holding it in place a few minutes.


Once it dried, I used an xacto knife to cut off the excess paper. Then I sealed the outside of the paper with the Mod Podge and allowed it to dry completely.


Here it is on my new nightstand. 


Thanks for stopping by!


Thursday, July 11, 2013

How To Reap The Benefits Of Weight Watchers Without The Monthly Fee

Okay...first let me say I am not now, nor have I ever been associated with the Weight Watchers™ Program and I strongly advise you to try the ACTUAL Weight Watchers program first. You can sign up here. I have followed the program several times. The first was back in December 2009. Literally days after Christmas pictures were posted on Facebook and I was horrified to see what I looked like. My sister-in-law was following the program and was looking amazing. It should be said that she looked beautiful prior to this but the difference was noticeable. And I had heard from others who had done it before as well all having had great results. So I signed up. I did the online program and sure enough I was losing weight. And I did really well. I had giving myself one year to reach my goal but by May I had reached it. I thought that I knew how to eat by now and decided that I didn't need to follow it anymore…well after a while I got lazy and put a few pounds back on…not anything major but I wasn't happy with myself. And then the WW Points Plus program started. And I decided to sign back up and try that one. I purchased a calculator from them to help aid me while shopping. I search online and found a few recipes on the WW website and made those…often. And I was doing well…but then I got pregnant. So, I quit WW…again. And throughout my pregnancy I gained 46 lbs! I’m a short girl and that is A LOT of weight. I felt good though and people helped me feel good about myself too…my OB however, told me immediately, early on in my pregnancy that I was only supposed to gain 15-25 lbs throughout the entire pregnancy…whoops! Anyways…after I gave birth the weight did start to come off…I was exercising regularly but then, as I shared before, I had an RA flare up in my right wrist which really brought my weight loss to a halt. In fact, I was placed on long term use Prednisone…which over 6 months I had gained 7 lbs….ugh! Which brings us to January 2013…I was determined to get this weight off but I really didn't want to pay for the online service because I didn’t think I would use it as much and because of my work schedule I wasn't going to be able to attend meetings. That’s when I decide to do it myself. I had followed the program before so I had a pretty good understanding of how it works AND I already had a calculator to help me figure out point values (and it figures out you how many points you are allowed in a day). So I thought about getting cook books. I searched on Amazon and sure enough they had some! I first purchased The New Complete Cookbook, Dining Out Companion and Complete Food Companion set. I was determined to stick with this and figured the best way would be to plan my meals in advanced, shop once a week so I had all my ingredients and I would TRY NEW THINGS (because that was really lacking before)! To figure out meals for the week, I planned to make dinner and the leftovers would be used the next day for lunch. I cook 5 days a week (M-Thurs and Saturday) and I vary my points day to day, meaning if on Monday I make a 9 point meal then Tuesday I would aim for around 6. That way on Tuesday I had my 9 WWPP meal for lunch and 6 WWPP meal for dinner—that’s 15 of my daily points right there. And I usually have about 10pts for breakfast now I’m at 25 WWPP. I also love sweets so I save some points room for those. So out of a 29 point day, I would use 25 WWPP for meals and then had 4 pts left for a dessert like ice cream! I made my own food journal…and being crafty I mean I made my own food journal…made up daily sheets and made the cover with scrapbook paper and chipboard and bound it with the Zutter bind-it-all. So now I had my calculator, my food journal, meals planned out and I started to drink lots of water. I usually drink between 64-80oz a day. By May I reached my goal weight, which was 10 pounds less than my pre-pregnancy weight. I just stuck with it. By then I had found lots of great recipes but wanted to try more so I purchased the Weight Watchers One Pot Cookbook. Then, when warm weather hit, I went out and walked with my family. I found some YouTube videos of great workouts I can do at home and I just keep doing what I’m doing. My husband told me that I should measure myself so I would know exactly how much and where I lost. I also took 2 before pictures. Here they are:


And these are my after photos. These were just taken over the 4th of July weekend. I've lost nearly 24 inches over my entire body...almost half of that was around my waist!


I hope this post helps inspire you. If you have any questions, please ask! And as always, thanks for stopping by!

Sunday, July 7, 2013

Pinspiration Sunday: DIY Roman Shades

So as part of our bedroom makeover we needed to get rid of our awful green curtains that came with the house we bought almost 4 years ago. I was very excited, and so was my husband...he hated those curtains. I found several tutorials on Pinterest for DIY Roman Shades but the one I liked the most was from Terra over at Simply Mrs. Edwards. She does an excellent job with this tutorial. Honestly, if you don't understand my directions, please ask me or hop on over to her page. 

Here's what I used:
Cheap mini blinds (got 'em from Lowe's for about $4 each)
Fabric for the curtains (I got a cotton floral pattern from JoAnn's)
Lining fabric (I used a blackout liner which was 50% off  [also from JoAnn's] so I bought the entire roll because my husband wants these throughout the entire house)
Permanent Fabric Glue (which later I ended up touching up with hot glue) 
 sewing machine & thread to match your top fabric (or iron-on hem tape)
Fabric Scissors
Fabric Marker
Pins 
Iron & Ironing Board
Yard Stick and/or Tape Measure 
Butter Knife

First thing was first...measuring the window. Of course the window within the frame was an odd width, like 28 inches or something. Well on Lowe's they came in 27 or 29 inches (for the cheapies). I went with 27 so they would fit inside the frame. The length was 58 inches.

Now it was time to measure the fabric and liner. I ironed them first. Then measured and cut my fabric. The decorative cotton fabric should be 2 inches wider and 6 inches longer than the window measurement (so mine was 29" X 64") and the blackout fabric should be the exact measurement of the window (that made mine 27" X 58") I then laid out the fabrics, patterned fabric face down and the liner white side up (to blend with the mini blinds) with the liner being smack dab in the middle of the cotton. That left the cotton fabric to have 1" on each side and 3" on the top and bottom bigger than the liner.


Next fold the cotton fabric over the liner 1 inch on each side (so the fold is against the liner). Pin it and then iron it to crease that edge.

Then sew along those edges. I finally got to break out my new sewing machine I got for Christmas!!!

Now, let's work on destroying disassembling those mini blinds. Stretch the blind out. Cut the thin strings that control the angle of the blinds, leaving the thicker cord attached! If you cut that thicker cord, then you cannot lower and raise your blinds! So please be careful. If you have any questions refer to Terra's image
Next comes the removal of the mini blinds. On the bottom weighted bar you will find 2 buttons which you can easily remove with a butter knife. Once you remove them, untie the string inside and remove all the blades EXCEPT for the number of folds you wish to have in your finished shades plus the weighted bar. I decided to have 7 folds, so I kept 6 blades + the weighted bar = 7. Once you have the number of blades remaining pull the cords back through the weighted bar and temporarily tie it so the blades don't come off. Once you have the blades glued in place you can tie them off and plug up the holes again.
Now it's time to mark the distance between the folds. You do this by dividing the length of you blinds by the number of folds you have. My windows are 58" and divide that by 7 gave my 8.285 and so on. I roughly measured them to be about 8 1/4 inches between each blade and marked it with my fabric marker. Then I placed my blind on top of my face down fabric lining my blades up with the marked spots. 

Then it's time to glue those blades down. It's VERY IMPORTANT to keep the glue away from the strings! I mean, that is if you plan on raising and lowering these soon-to-be gorgeous blinds.  When gluing the top, just glue the front and do not place glue to the edge. The blinds get held in by placing a plastic piece in front. You want to leave room to move the fabric out of the way to get those pieces in and cover over them with the fabric. 


The weighted bar should have fabric glued around it tightly, but don't glue the string. Cut slits in the fabric so that it goes around the pull cord. Cut off any excess fabric. 
Allow the glue to set up on your blinds. I allowed mine to sit overnight.
Next, recruit a handsome man to climb up on a ladder or step stool to install your brackets. Honestly, you did the hard work already, right?!?! 
Now Terra says to attach the brackets to the side of the window...well that didn't work for me because my windows were an odd width and I bought smaller blinds so we had to attach them to the top. So if you can do the side attachment, then please do, but you can make it work if you attach them to the top too. You just have to finagle the fabric over it...it worked for me! If you attach them to the side, slide in you blinds, place plastic piece to hold it in place then take the extra fabric and tuck it up and over the top and you're done.

Hope yours turn out as great (and maybe even better) than mine! Thanks for stopping by!

Tuesday, July 2, 2013

Broadening My Creativity

So as you have probably guessed if you follow my posts at all, that I am a huge fan of Marion Smith. If you don't know who she is, you should check her out over at A Piece of Craft. She is AMAZING and a huge inspiration to me! From her blog you can check out her website where she sells scrapping kits and she creates her own printable mini albums...which I LOVE! I will be sharing some of my minis I made using her printables very soon. You can also get to her YouTube channel through her blog as well. She has great tutorials. The reason that I am telling you all this is because she has inspired me to create my own printable mini album. I started out knowing nothing about digital designs but my best friend, Angela, taught me so much! So I just wanted to share this with you. I have been hard at work creating some pages. I have a long ways to go and a lot more to learn but I'm having so much fun with this. I can't wait to share my final project with you. Here's a page sample  :)


Thanks for stopping by. Let me know what you think!