Tuesday, June 25, 2013

White Washed Wood

At work one night I came out of my exam room to find this brown, wooden box in the housekeeping trash can. I did not dumpster dive for this, it literally was just setting on top of a giant trash bin. And so...I ask if it was trash. Cathy, our lovely Rad. Dept. "environmental service" member assured me that no one wanted it...and so........I took it! It's FREE! My favorite 4 letter F-word. But she made me promise to share with her what I made with it. And I'm not just going to share with her...I'm going to share with all of you! This is my new nightstand!


So I took this old box-like thing...sanded it by hand and cleaned it off...


Next I mixed some latex white paint with water...made it pretty runny (I figured the runnier the better...you can always add layers).Then I dipped a washcloth in the watered down paint and brushed the box, using the same direction for each stroke. I ended up doing 2 coats and allowed them to dry in between (which happened pretty quickly because I did it on my back porch with the 90 degree sun beating down on me).


After it was completely dried, I sanded the edges (cause I like that look).


Finally I sprayed a sealant all over and allowed that to dry. Then I attached it to my wall about nightstand height using shelf brackets (bought from Lowe's) that we had left from a shelf we were using prior to our bedroom makeover.


This was a VERY easy and quick project. I hope it gave you an idea for some trash to treasure projects. Thanks for stopping by!

Sunday, June 16, 2013

Pinspiration Sunday: Pallet Shelf

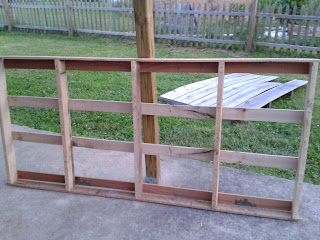
A while back I pinned an idea for a pallet shelf. So with our bedroom makeover I told my husband I wanted to make one. We talked about where we could get the pallet for FREE (there is that four letter word again)! During our discussion of where we could check, my neighbor, Mark, who owns a painting business, received a delivery on none-other-than...you guessed it, A PALLET! This gave me very high hopes! So the next time I saw Mark I asked if we could have the pallet as long as he didn't need it for anything...The next day he had it propped up against our fence...YAY! But there was a catch...this was a VERY LARGE pallet...which honestly wasn't a problem because we have HUGE, blank walls in out bedroom, but this pallet was not set up like the one I had pinned so I had to do some work. Here's what it looked like when we received it.


But this is what my original pin looked like from Amanda Carver Designs:


For a free pallet, mine was in great condition. Unfortunately for me, I wanted it to look old and I needed it rearranged with some shelving within it because I wanted it to hang horizontally on our wall, not vertically...we actually have plenty of space to do a ginormously tall shelf but...I want what I want...ugh...I had my work cut out for me. Now it was time to get busy taking the boards off one side. I used a hammer and pry bar thing (don't you love my terminology?) to carefully remove the boards...but man, those things were on there good...for the most part I managed to keep the boards in pretty good condition...my husband on the other hand wanted to give it a try and just destroyed a piece...I took back over after that...men. Once the boards were off one side, I took two and reattached one to each end to form a top and bottom.


Next came time to age the wood. I search for ideas and kept finding the same thing...vinegar and steel wool. So I went on a quest to find steel wool. Turns out it's near painting supplies (I totally Googled it while wandering Wal-Mart). I came home, poured the vinegar in a bowl, popped in a few steel wool pads put some gloves on (because I hate the smell of vinegar) and got to rubbing.This is what it looked like in the end of the aging process:


Next came placement of the shelves. There was another partial pallet we had from a long ago project that we needed to cut and fit into this shelf. My husband thought I would cut my fingers off if I used the saw wanted to help out so he handled the saw and attached the shelves. I finished up by attaching some spare pieces to the front. And this is what it looked like when we finished:


Now it's on our wall! YAY!


I'm so proud of this project because it was large and took some hard work and I did almost all of it myself. I've been working on all kinds of projects for our new bedroom. You see those roman shades and that nightstand/shelf in the back corner.? I made 'em! So check back to see those projects posted very soon!  

Sunday, June 9, 2013

Pinspiration Sunday: Colored Mason Jar

So I found a couple pins demonstrating how to color regular ol' Mason jars and the one I tried was from Six Sisters' Stuff. This one is made only using food coloring, water and Mod Podge...and then you bake 'em. I really liked how Elyse's turned out. Here are mine:
Here's what you need:
Mod Podge
Water
Food Coloring
Wax paper
Baking Sheet
Paper plates and throw-away spoons 
 (Or whatever you want to use to mix the colored mod podge/water mixture up with)
Oven and oven mitts
Start by Preheating the oven at 200 degrees. Next, make your coloring concoction by mixing together 2 Tbsp of water with 4 Tbsp of Mod Podge and your desired amount of whatever food coloring you choose. I made one just red and the other I mixed equal parts of red and yellow to get orange.
Once you have your desired color made, pour your Mod Podge medley into the desired jar and swirl, turn, tilt until you have coated the entire inside. Then pour out the extra. Carefully wipe the rim if any of the coloring covered the outside. Place your jars upside down on to a wax lined baking sheet. Bake for 3 minutes.

Remove baking sheet. Wipe the jar mouths again for any extra liquid that may have accumulated and turn the jars upright. Place back into oven and bake until clear...Elyse says about 30-40 min. Mine were done a little sooner.
Pull them out and allow them to cool. Then decorate as you please!


**Special Note: Do NOT store any food products in these jars...Mod Podge is not food safe! Thanks :)


Wednesday, June 5, 2013

Rheumatoid Arthritis

I know this is a blog about crafting and what not but I just wanted to share some info about RA and the medication, Enbrel, used to treat RA. For anyone who is not familiar with Rheumatoid Arthritis (RA), it is a disease where your immune system mistakenly attacks healthy joints. This causes pain, stiffness, swelling and if the inflammation continues for too long, it can cause bone erosion. Why am I talking about this? Well it's been nearly 4 years since I was diagnosed with this disease. I was put on several medications (Plaquenil and Mobic) to help control it and if a flare up would occur, I would take a Prednisone dose pack (a 6 day supply where you take an overload of steroids to quickly calm the inflammation). And that worked for a very long time...until last June. Last June I had a flare up in my right wrist....now I'm an diagnostic medical sonographer (which is the really fancy (and I will say, well deserved) title of a board certified ultrasound tech) and I need this wrist to be inflammation free in order for me to do my job. Well I took my dose pack...and that didn't work. So I took another....and that didn't work. Had an injection...and that didn't work. Took ANOTHER dose pack...and (I'm sure you've caught on by now) that didn't work. Then came adding new drugs....so we added long term use of Prednisone,  Methotrexate and folic acid (the folic acid doesn't do anything for the RA, it's used because the MTX depleats this vitamin and this drug can do some damage to the rest of your body so monthly blood work has to be done to watch liver functions). First I took 4 pills once a week...then 6...then 8...and still no improvement. Had an MRI just to verify that this was a RA problem and not something else...and guess what?!?! It's an RA problem. And since I had had this inflammation for months (this was now October) there was bone erosion too. So the next step? The miracle drug known as Enbrel (this is a crazy wicked drug...I say this because this drug completely destroys your immune system...I was told to tell my primary care physician that I started it because I would need to get in for check ups at the first sign of sickness). Enbrel is a once a week injection...ugh! I hate needles...but I could not go on with the pain any longer. After jumping through hoops for my insurance company...I finally had my first injection in December. The injection hurts while the medicine is going in...but the few seconds of pain (approx. 15 sec.) seemed worth it if it was going to work. After a couple weeks, my flare up was better....but then came problems with the injection...I started getting a wave of pain throughout my entire thigh of the leg I was injecting, that would last about 90 seconds. This pain made child birth seem easy...honestly...I know. That's not the worst of it...then I had the injection site reaction. This happens to be the most common side affect of the Enbrel. I would get these VERY large, red, hot, swollen and itchy rashes that lasted for weeks. I was told to treat the site...so I tried....I used hydrocortisone cream...no improvement. I tried calamine lotion...nothing. I went back to the doctor and he had me do this....one hour prior to injection take 500mg of Tylenol and one Benadryl then after I administer the shot I am to ice injection site. Now this helped with the pain that I got right after I gave myself the injection, but I still had a rash. I looked through my medicine cabinet one day and saw my jar of Tucks I had after I delivered my son. I read the package...it says it helps with swelling and itchy irritation...hmmmm...I thought. 


And so I tried it...I rubbed the area with a pad each time I went to the bathroom...and sure enough, it worked! Now I use these and within 2 days the rash is gone...and it never gets too big and NEVER itches! IT'S AMAZING! I told my doctor and he was as surprised as I was...and he told me that he was going to share that information with other patients who are having the injection site reactions. So I thought I would share this with all of you. Hope this helps anyone out there who is having problems.