Wednesday, June 5, 2013

Rheumatoid Arthritis

I know this is a blog about crafting and what not but I just wanted to share some info about RA and the medication, Enbrel, used to treat RA. For anyone who is not familiar with Rheumatoid Arthritis (RA), it is a disease where your immune system mistakenly attacks healthy joints. This causes pain, stiffness, swelling and if the inflammation continues for too long, it can cause bone erosion. Why am I talking about this? Well it's been nearly 4 years since I was diagnosed with this disease. I was put on several medications (Plaquenil and Mobic) to help control it and if a flare up would occur, I would take a Prednisone dose pack (a 6 day supply where you take an overload of steroids to quickly calm the inflammation). And that worked for a very long time...until last June. Last June I had a flare up in my right wrist....now I'm an diagnostic medical sonographer (which is the really fancy (and I will say, well deserved) title of a board certified ultrasound tech) and I need this wrist to be inflammation free in order for me to do my job. Well I took my dose pack...and that didn't work. So I took another....and that didn't work. Had an injection...and that didn't work. Took ANOTHER dose pack...and (I'm sure you've caught on by now) that didn't work. Then came adding new drugs....so we added long term use of Prednisone,  Methotrexate and folic acid (the folic acid doesn't do anything for the RA, it's used because the MTX depleats this vitamin and this drug can do some damage to the rest of your body so monthly blood work has to be done to watch liver functions). First I took 4 pills once a week...then 6...then 8...and still no improvement. Had an MRI just to verify that this was a RA problem and not something else...and guess what?!?! It's an RA problem. And since I had had this inflammation for months (this was now October) there was bone erosion too. So the next step? The miracle drug known as Enbrel (this is a crazy wicked drug...I say this because this drug completely destroys your immune system...I was told to tell my primary care physician that I started it because I would need to get in for check ups at the first sign of sickness). Enbrel is a once a week injection...ugh! I hate needles...but I could not go on with the pain any longer. After jumping through hoops for my insurance company...I finally had my first injection in December. The injection hurts while the medicine is going in...but the few seconds of pain (approx. 15 sec.) seemed worth it if it was going to work. After a couple weeks, my flare up was better....but then came problems with the injection...I started getting a wave of pain throughout my entire thigh of the leg I was injecting, that would last about 90 seconds. This pain made child birth seem easy...honestly...I know. That's not the worst of it...then I had the injection site reaction. This happens to be the most common side affect of the Enbrel. I would get these VERY large, red, hot, swollen and itchy rashes that lasted for weeks. I was told to treat the site...so I tried....I used hydrocortisone cream...no improvement. I tried calamine lotion...nothing. I went back to the doctor and he had me do this....one hour prior to injection take 500mg of Tylenol and one Benadryl then after I administer the shot I am to ice injection site. Now this helped with the pain that I got right after I gave myself the injection, but I still had a rash. I looked through my medicine cabinet one day and saw my jar of Tucks I had after I delivered my son. I read the package...it says it helps with swelling and itchy irritation...hmmmm...I thought. 


And so I tried it...I rubbed the area with a pad each time I went to the bathroom...and sure enough, it worked! Now I use these and within 2 days the rash is gone...and it never gets too big and NEVER itches! IT'S AMAZING! I told my doctor and he was as surprised as I was...and he told me that he was going to share that information with other patients who are having the injection site reactions. So I thought I would share this with all of you. Hope this helps anyone out there who is having problems.

Sunday, May 26, 2013

Pinspiration Sunday: Transfer Laser Copy Picture to Canvas


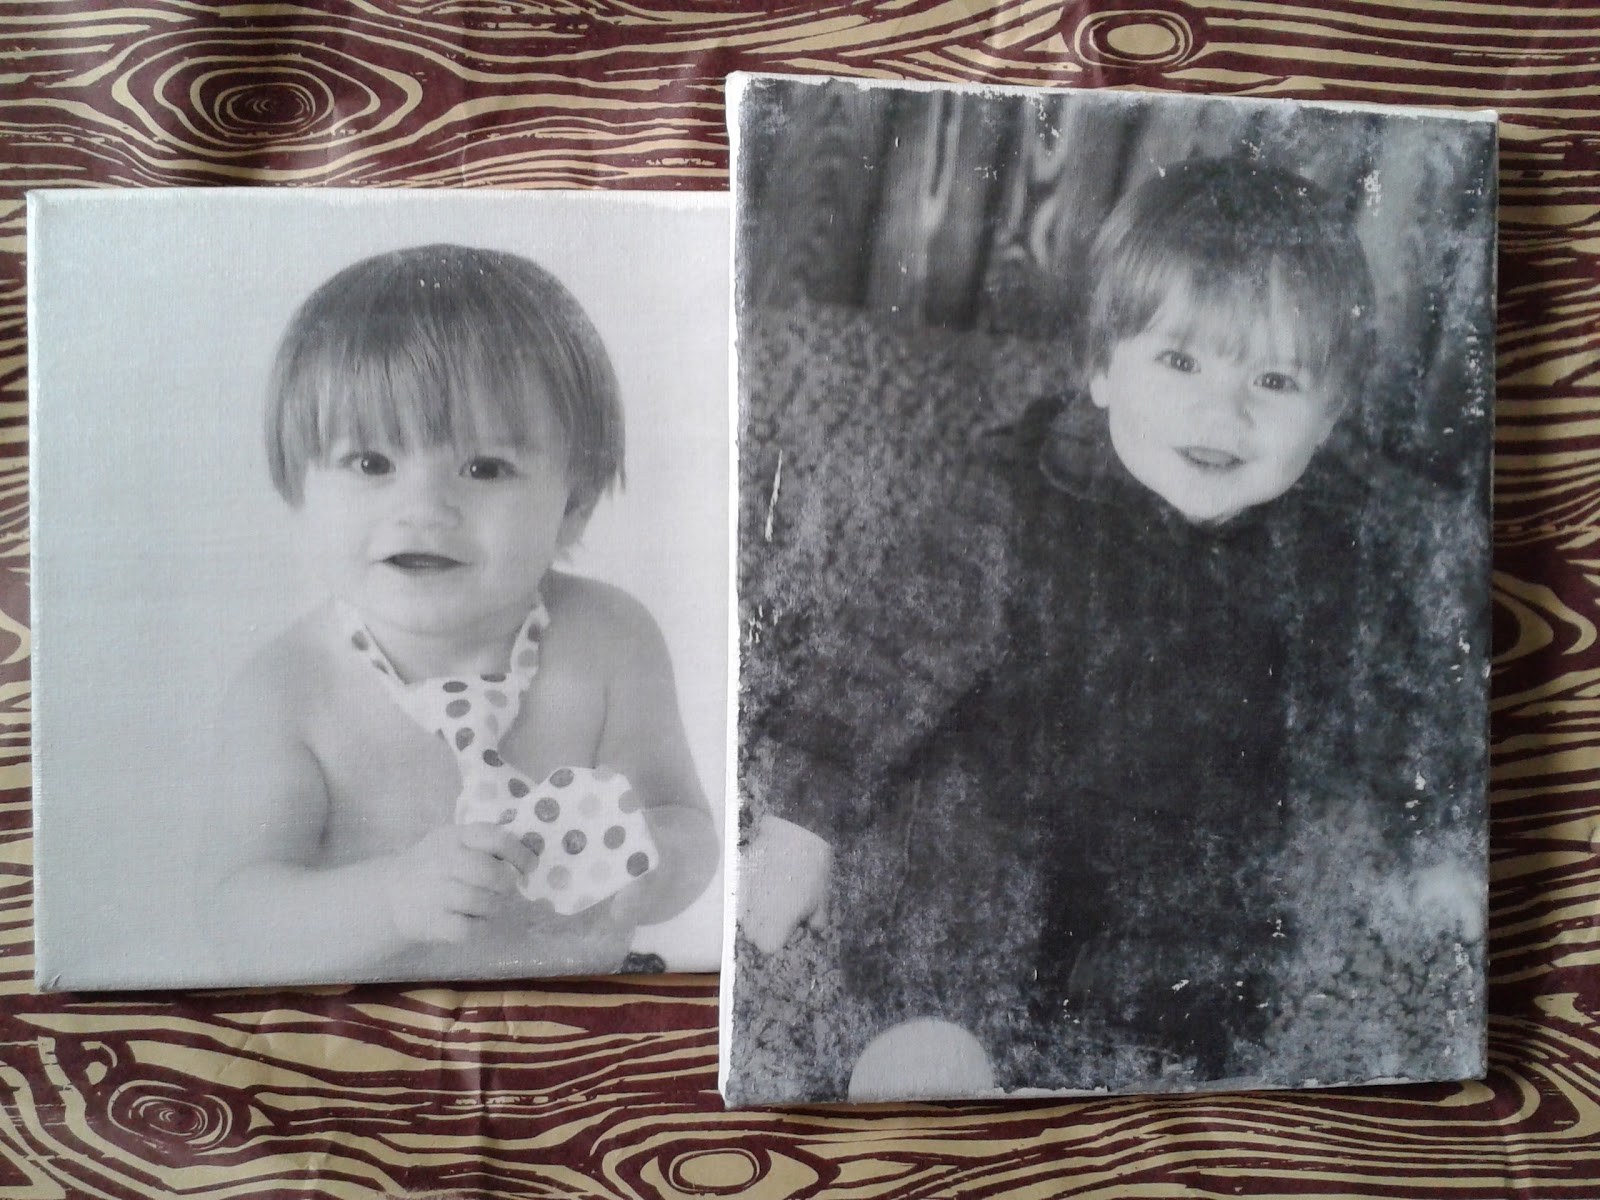
Thanks to the wonderful world on Pinterest, my best friend, Angela, and I stumbled across A Beautiful Mess and we're pretty much desperate to hang out with Elsie and Emma. They encompass all that we love. There are a number of great projects that I am looking forward to creating….and this is one of them. This is transferring a picture to canvas. I’ll take you through how I made my first one, however, I don’t really like how it turned out. The reason being is that I think there is too much dark tones so I tried it with a lighter image and I love how it turned out.


So here’s what I used:
Laser copy of picture (I made it 8 X 10 because that’s the size canvas I had)
Spray bottle with water
Paint brush
Canvas (I got a 10 pack from A.C. Moore. It was regularly $19.99 but I used a 40% coupon!)

My pictures are from the very talented Karey Dean of Karey Dean Photography.  She captures the most beautiful images. And to be honest, since these pictures are a black and white copy they DO NOT  do her work justice. She is so incredibly talented! You can check out her amazing portraits and other photos on her website,  her blog or on Facebook.


I covered the entire front of an  8 X 10 canvas with the Liquitex.
 Placed my photocopied image face down on top of the canvas, smoothed it out and allowed it to dry overnight.
 

The next morning I misted the paper with water from my spray bottle and gently rubbed until the image showed through. This is a long process….don’t try to hurry it too much or you will rub the image right off the canvas (although I like the look of that scattered throughout).

 
Once finished, seal in the image with the gel medium and allow to dry….then hang and enjoy!

The darker the image the more the paper fibers showed....so, I tried it with a picture a little brighter.
 
 
I just want to thank you, Karey, for allowing me to use your stunning pictures for this! And thank you to everyone who stopped by to check out this project!

**Special Note: A Beautiful Mess had lots of questions from their original post. I encourage you to check them out if you are having any difficulties. They go through and show different techniques and products used which did not have as good of an outcome as I have just demonstrated. I followed exactly how they described being the best way to complete this project....have fun!

Tuesday, May 21, 2013

DIY Picnic Table

I had to share this AMAZING project my husband did. This picnic table with a cooler in the middle is absolutely wonderful. It took my husband one week, working only a few hours each day to build this all by himself and it turned out great! He found the FREE plans on The Design Confidential. Below are pictures of his progress.


FINISHED!

 
Thirsty?


Sunday, May 19, 2013

Ellie's Birthday Cake Martini


So I found a couple recipes on Pinterest for Cake Batter Martinis or Shots and I really wanted to try the martini. Well....that was A LOT of alcohol. So looking at the two recipes, I came up with my own. So if you like tasty drinks with a hint of liquor, this will work for you.
 
My recipe:
2 oz Cake Vodka
1/2 oz White/Clear Creme de Cacao
1 oz Godiva White Chocolate Liqueur
3 oz Half & Half (I used Fat Free)
2 (heaping) Tbsp White Cake Powder (I used Funfetti)
Ice
Sprinkles (for glass rim)
 
Pour sprinkles onto a plate. Wet rim of glass with water or half and half (I used water). Dip rim of glass into sprinkles. Add all other ingredients to a shaker and shake for 30 seconds. Strain into martini glass. Enjoy!
 
Recipe makes one serving.


Sunday, May 12, 2013

Pinspiration Sunday: DIY Canvas Quotes


I absolutely love these simple art pieces with a catchy phrase on them. When I came across this Pin from Southern Belle Soul, Mountain Bride Heart, I quickly wanted to try it.

Here’s what you will need:
Canvas
Newspaper, book pages, magazines
Adhesive/Sealant (i.e. Mod Podge)
Paint brush
Paint
Letter stickers

Here’s what I used:
8X10 canvas
Newspaper
Mod Podge in Matte
Paint brush
Orange and Bronze acrylic paint
Sticker letters (I made mine using a Cricut Machine, Cricut Craft Room Software, Cricut Vinyl, Plantin Schoolbook cartridge…all I had, so no purchase necessary!)


First I covered the canvas with Mod Podge and firmly pressed the newspaper on to the canvas and allowed it to dry overnight.Unfortunately my newspaper was attached a little crooked :^/ But what are ya gonna do? It's homemade!


My words are lyrics from The Lumineers’ song Dead Sea. I cut them out and placed them on the newspaper covered canvas.


Next I combined the orange and bronze paint until I reach my desired color and painted over the entire canvas (2 coats allowed them to dry in between) including the sides.


Then, carefully removed the letters.


Seal with Mod Podge…and you’re done!


This will look great on our made over bedroom wall :)

Here's the inspiration from Southern Belle's:


Friday, May 10, 2013

Ch-ch-ch-ch-Changes

As you can see my blog is set up a little different from before. I'm trying out some new styles, and honestly it's going to change again. Change is a good thing...I think. I hope you guys don't mind and keep checking back! Thanks!

Wednesday, May 8, 2013

Thrifty Finds & Spray Paint

So my husband and I decided to makeover our bedroom...our walls are white (our entire house was when we bought it) and the curtains are green (they came with the house). We haven't done anything to the room since we bought it....well actually that's a lie...our carpet smelled like dog urine so we pulled up the carpet and put down laminate wood flooring. So needless to say, the room needs some....pizazz. We decided on a color scheme of gray, orange and white. The walls will be gray, the trim white and lots of craft and DIY projects to decorate. I've already bought the fabric I'm going to use to make roman shades from vinyl mini blinds (which hen will be a future tutorial). And there are some wall hangings that I found at the thrift store or flea market. This is what I started with. I had a couple of frames I got from thrift store., I'm pretty sure the one was $1 and the other was 75 cents. The owls were found at either a thrift store or yard sale for 50 cents or less.


Next it was time to make them match our new bedroom. I bought Valspar satin spray paint in La Fonda Copper from Lowe's for about $4. I sprayed all my items and allowed them to dry. Here's what they look like.


I will be posting other bedroom makeover projects as I complete them. And once our bedroom is complete I will be sure to share pictures with you. Thanks for dropping by!