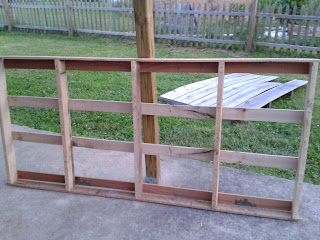
A while back I pinned an idea for a pallet shelf. So with our bedroom makeover I told my husband I wanted to make one. We talked about where we could get the pallet for FREE (there is that four letter word again)! During our discussion of where we could check, my neighbor, Mark, who owns a painting business, received a delivery on none-other-than...you guessed it, A PALLET! This gave me very high hopes! So the next time I saw Mark I asked if we could have the pallet as long as he didn't need it for anything...The next day he had it propped up against our fence...YAY! But there was a catch...this was a VERY LARGE pallet...which honestly wasn't a problem because we have HUGE, blank walls in out bedroom, but this pallet was not set up like the one I had pinned so I had to do some work. Here's what it looked like when we received it.
But this is what my original pin looked like from Amanda Carver Designs:
For a free pallet, mine was in great condition. Unfortunately for me, I wanted it to look old and I needed it rearranged with some shelving within it because I wanted it to hang horizontally on our wall, not vertically...we actually have plenty of space to do a ginormously tall shelf but...I want what I want...ugh...I had my work cut out for me. Now it was time to get busy taking the boards off one side. I used a hammer and pry bar thing (don't you love my terminology?) to carefully remove the boards...but man, those things were on there good...for the most part I managed to keep the boards in pretty good condition...my husband on the other hand wanted to give it a try and just destroyed a piece...I took back over after that...men. Once the boards were off one side, I took two and reattached one to each end to form a top and bottom.
Next came time to age the wood. I search for ideas and kept finding the same thing...vinegar and steel wool. So I went on a quest to find steel wool. Turns out it's near painting supplies (I totally Googled it while wandering Wal-Mart). I came home, poured the vinegar in a bowl, popped in a few steel wool pads put some gloves on (because I hate the smell of vinegar) and got to rubbing.This is what it looked like in the end of the aging process:
Next came placement of the shelves. There was another partial pallet we had from a long ago project that we needed to cut and fit into this shelf. My husband thought I would cut my fingers off if I used the saw wanted to help out so he handled the saw and attached the shelves. I finished up by attaching some spare pieces to the front. And this is what it looked like when we finished:
Now it's on our wall! YAY!
I'm so proud of this project because it was large and took some hard work and I did almost all of it myself. I've been working on all kinds of projects for our new bedroom. You see those roman shades and that nightstand/shelf in the back corner.? I made 'em! So check back to see those projects posted very soon!
I'm so proud of this project because it was large and took some hard work and I did almost all of it myself. I've been working on all kinds of projects for our new bedroom. You see those roman shades and that nightstand/shelf in the back corner.? I made 'em! So check back to see those projects posted very soon!


.jpg)

No comments:
Post a Comment