Showing posts with label Autumn. Show all posts

Sunday, August 10, 2014

Pinspiration Sunday: DIY Changing Pad Cover


Here's another post on getting the nursery ready. I'm on overdrive as they are thinking of placing me on bed rest and have given me steroids in case I should have a preterm delivery. So it's time to get these projects done. This one came from Pretty Prudent again. I used the left over fabric from my crib sheet tutorial and my adjustable crib skirt tutorial.

Supplies:
Fabric of your choice
sewing machine
thread 
elastic
pins and a safety pin
scissors
measuring tools
iron

*Be sure to wash and dry your fabric before you begin*


My changing pad is the standard  32" long X 16" wide and 3-4" high so these directions are for those measurements. Since I used two fabrics I measured one to be 17.5" X 32" and the other 30.5" X 32". or you can use one fabric and cut it to measure 48" X 32".

Place your fabrics facing one another along the 32" side and sew them together. Jaime suggested then trimming the seam with pinking shears but I don't own those so I did not (like I've said before I'm not a seamstress). Then iron your seam flat.


Next cut 8" X 8" squares out of each corner. 


Now with the two sides facing each other sew along to create your corners.


Now it's time to create the hem to feed your elastic through. Fold your fabric over about a half inch  or so and iron. Then fold over again and pin (this time I didn't iron...I'm lazy). Next sew along to create your hem leaving room so that you can thread your elastic through. Start in one corner, back stitching and leave room when you come back to that corner to thread the elastic and back stitch.


Add caption

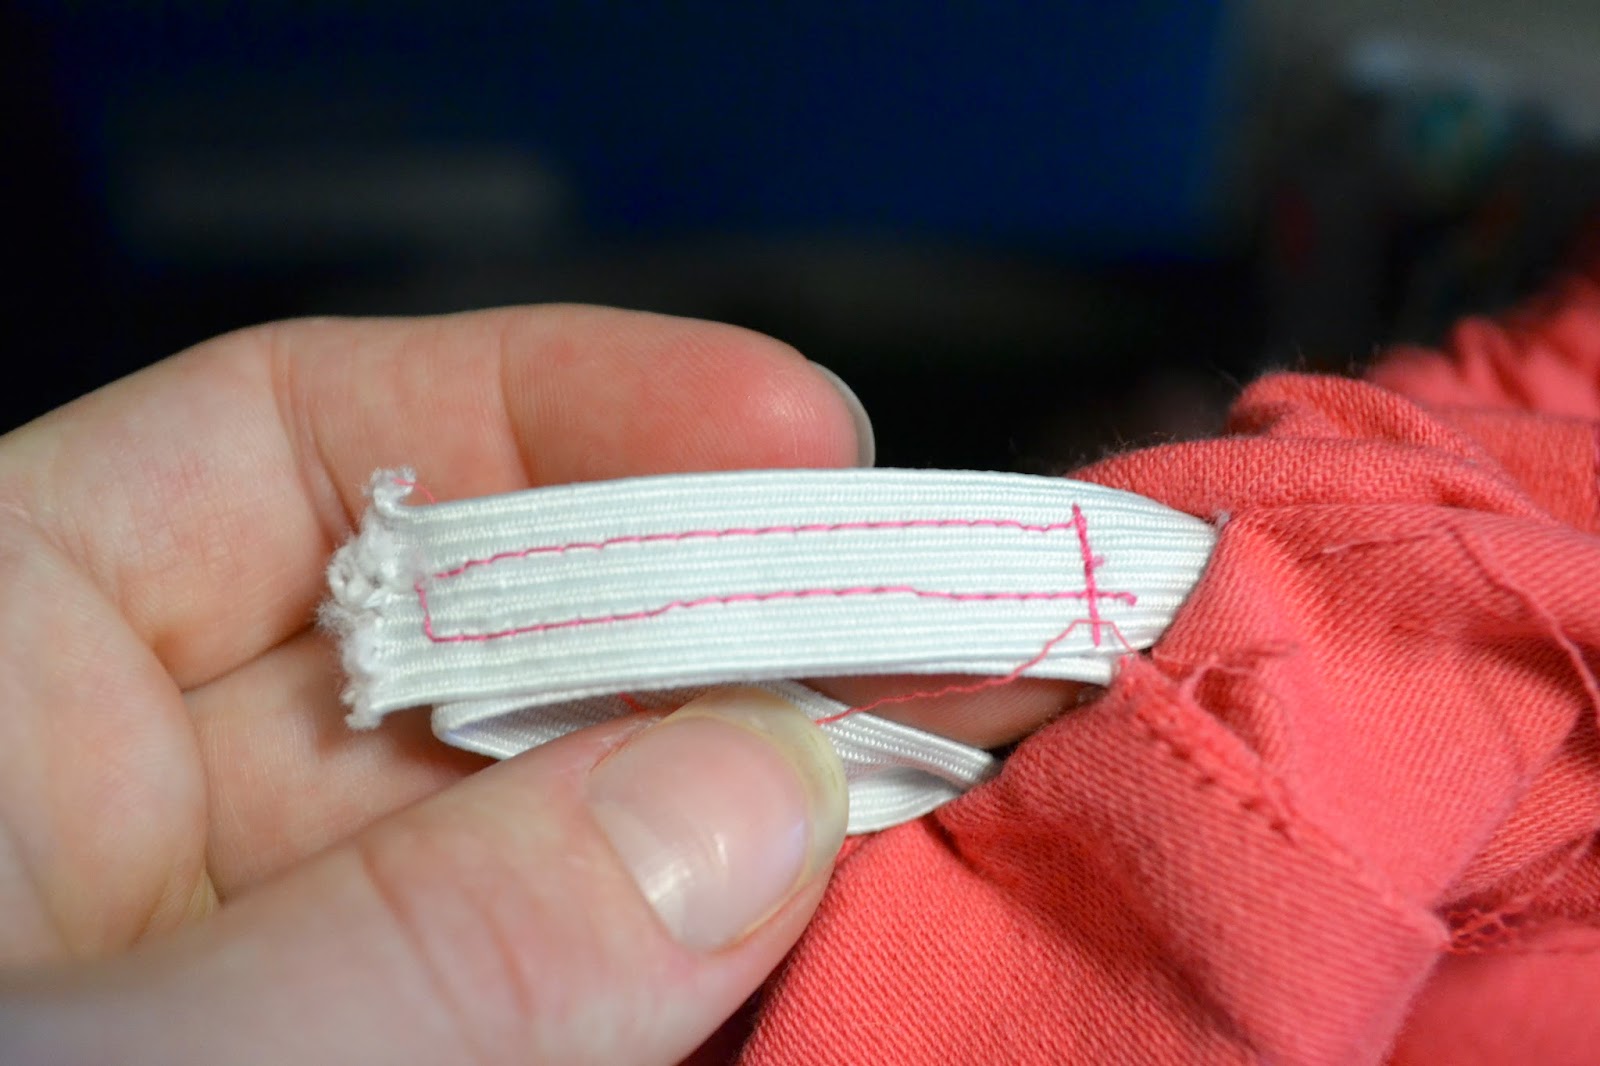
Jaime said to use a yard of elastic 5/8" or less. I used a 1/2" elastic and once I finished it was too tight and my changing pad would not lay flat so I took the elastic out and used a 46" piece and this worked great for me. Pin one end to the cover and pin a safety pin to the other end and feed through the hem you've made.


Once all the way through, sew the two ends of the elastic together. 


Now you can finish sewing the gap you left. You should get something that looks like this.


Now it's time to put it on the changing pad...you're done!


Thanks for stopping by!


Monday, November 25, 2013

DIY Felt Pine Cones

So I tried searching for a way to make felt pine cones...well...in the end I took several ideas and put them together and this is what I came up with.

Here's what you'll need:
Hot glue and gun
Scrap paper
Brown felt
Bottle cap
Tim Holtz On the Edge die--Brackets
Tim Holtz Tattered Florals
Sizzix machine

Here's a video to show you how to make them:


You you liked this video! Good luck on your project! Thanks for stopping by!


Thursday, October 31, 2013

Spooktacular Mini Winner

And the winner is...

CASSANDRA A.

You are the winner of the Spooktacular Halloween Mini Album. You get the chance to choose how you receive your prize either as a free printable, a kit, or a finished project where you just add the picture. Congratulations! I hope you enjoy it!

Sunday, October 20, 2013

Pinspiration Sunday: Rag Wreath


I've seen a lot of rag wreaths floating around Pinterest and I finally decided to make my own. As I'm sure we all know burlap is pretty cheap....however, I decided to buy some orange burlap with gold threading...which looks awesome but was WAY MORE EXPENSIVE than the regular burlap and I was kicking myself for purchasing it. But to be honest...I LOVE the way this wreath turned out using that crazy expensive burlap. 

So here is what I used to make my wreath:

burlap (3 yards purchased but I only used about 2 1/2)
wire wreath form (18in with 4 wires going around)
glitter spiders from Walmart (which I had left from this project)
glitter spider and web from Michael's
hot glue and gun
Made my own "spooky" sign
ribbon for bow

To get started I cut strips of burlap in about 1 inch sections. I used the method of removing one thread then cutting along that line to help the burlap from fraying. (If you need further instructions on that I would be happy to share it...just let me know) Which gave me very long pieces. Then I cut those pieces either into 3rds or 4ths. Next I worked wire by wire, section by section, tying the burlap pieces on. Once I had all four wires in one section filled then I would move to the next section. This is a very long process and cutting and working with burlap is very messy (just a warning).  For a great video explanation on how to put this together, check out this video from Cassie & Co Blog.

After many hours...the wreath was finally covered. Make sure all your knots are in the back and strips of burlap are facing forward. 


Then it's placement of your decorations. I made my bow myself...and I'm amazed it turned out as good as it did...I have never made a "fancy" bow...and I had no idea how to do it. I used a no-wire satin ribbon...very difficult to work with. I would strongly recommend using as wired ribbon and look on YouTube for some great videos on how to make the perfect bow. I attached my bow with floral wire (which is actually still visible...but shhhh!)


Then I added the spiders and spider/web decorations with hot glue. 


I made my "spooky" decoration by using my Cricut machine, scrapbook paper (one piece was glittery) and wet glue. Once it dried, I hot glued that into place. 


Finally I hung it on my front door.


And there you have it...burlap rag wreath. Again I want to stress that this is time consuming and pretty messy. But it's worth it, I think. And it's pretty cheap (as long as you don't buy burlap with gold thread in it). 

REMINDER:
Oh and don't forget I'm giving away my Halloween printable mini scrapbook...you decide how you get your prize...you can get the download for FREE so you can print out as much as you want and assemble it, you can have me send you it in a kit form for you to put together OR you can have me assemble it for you! What an awesome giveaway, right!?!?! To enter the giveaway just go to this POST and leave a comment. I will announce the winner on Halloween morning! Good Luck, everyone! Thanks for stopping by!


Sunday, October 6, 2013

Pinspiration Sunday: Spider Jar

Here's another great Halloween decoration that is SUPER EASY and VERY INEXPENSIVE! What is it??? You can make your very own jar of spiders! I've seen a lot of these floating around Pinterest and decided to make a few for around my house.

Here's what you need:
Jar (I used Ball's jars that I had on hand)
fake webbing
fake spiders

optional: 
battery operated tea lights
spray paint
glue dots

I got my supplies from Walmart. Everything was priced at $2.50 or below. 


First you put some fake webbing into your jar, then add  spiders. You could be done right there. But I decided for in my house I was going to add a tea light. I applied 2 glue dots to the bottom of the tea light (I used glue dots so I can open it up and remove the light again and again to turn it off and on.


Then secure the tea light to the lid of your jar.


Then place your lid on the jar and your done!


My jar outside does not have a tea light in it because I didn't want to have to keep going out to turn it off and on. but if you place lights near it, you can still see inside the jar.


You can also spray paint your lid. If you used Chalkboard spray paint, then you could write something like BOO! or Open If You Dare! on it. Hope you enjoyed the great and simple Halloween decoration idea. And don't forget, I'm giving away a FREE PRINTABLE MINI HALLOWEEN SCRAPBOOK! Visit this post and comment on it to enter for a chance to win! Thanks for stopping by!

Friday, October 4, 2013

Spooktacular! A Printable Mini Scrapbook

Well here it is...my newest printable mini...Spooktacular...and in case you didn't realize it a Halloween theme! Check out the YouTube video.


As I've done before...I'm giving away this mini for FREE!!!! This time you decide how you want it! Do you want it pre-made? Do you want the FREE download? Do you want me to send you a printed out kit (which I will get printed at a place like Staples since my printer is cooperating with me)? You decide. And to make this entry a little easier...all you have to do is comment on this post. I will pick a random winner on Halloween! Good luck, everyone!

Sunday, September 29, 2013

Pinspiration Sunday: Upcycled Book into Pumpkin


Since my best friend, Angela, and I raided a yard sale scooping up a ton of old Reader’s Digest books, I’ve been looking for projects I could do with them. Making a pumpkin seemed like a really great idea…at the time….I only say that because it’s a long tedious project. Just like my recycled book into keepsake box, this involves a lot of time cutting pages with an xacto knife.
Well anyways…let’s get started, shall we? First things first gather your supplies

I used:
Old Reader’s Digest book
Pattern from BHG—cut out
Valspar's La Fonda Copper Spray Paint
Acrylic Spray Sealant
Cinnamon stick
Burlap
Tattered Angel’s Glimmer mist
Lace/ribbon
Hot glue and gun

First I removed the cover and binding from my book (and put it away for safe keeping so I could do something with it later on). 


Next put my pattern on the book, traced it and started cutting away…this takes FOREVER…and with my RA, it didn’t feel so good on my wrist…but after awhile (for me I did it in stages over many days) you cut through all the pages and you have something that looks like this:


Now it’s time to start hot gluing pages. First, you want to glue the first and last pages together to make the pumpkin fully round. Next, you take a strip of hot glue along the binding, top to bottom, throughout the book. This helps separate the pages a little to make the pumpkin fuller. 

Space between the first and last page--glue these together

Start gluing between pages at the binding--make it full all the way around---fill in gaps

After, I did this, I sprayed the entire thing with my orange spray paint. I tried to separate pages so that the color would get on the inside as well…I was covered in paint by the end but the pumpkin looked good. I let that dry overnight. Then I carefully separated any pages that got stuck together from the paint and I added more hot glue along the binding to help separate pages as needed. Then I sprayed the pumpkin with my acrylic sealer. After that dried it was time to add the finishing touches. 


I took a cinnamon stick and broke it in half, and stuck one half in the center opening of the pumpkin top. I had some burlap leaves on hand that I made up a while ago using mod podged burlap and Tim Holt’s tattered leaves sizzix die. My leaves were in neutral colors so I decided to glimmer mist it using Tattered Angels leapfrog glimmer mist.


 Once that dried (I hurried it along with my heating tool), I hot glued it into place. I finished it off with a piece of lace ribbon that I tied around the pumpkin’s stem.


And there you have it…a pumpkin upcycled from a book! Hope you enjoyed this tutorial! Thanks for stopping by!


Saturday, September 28, 2013

Nothing Gold Can Stay Printable Mini Album Kit Winner

The winner of my Autumn Printable Mini is...

Arplytag

Congrats! I will be in touch so we can arrange receiving your album kit. Thanks everyone. Keeping checking back for my next printable mini album release and giveaway!

Tuesday, September 24, 2013

Don't Forget! Fall Mini Album Giveaway This Saturday


I just wanted to remind everyone of the FREE FALL MINI ALBUM GIVEAWAY! You can see this album on this post. For this giveaway, you get the printable (already printed out for you...unless you want the download for FREE!), plus the chipboard, some glue and maybe a few other things I can throw in ;) To enter all you have to do is FOLLOW THIS BLOG. I will pick the winner this weekend. If you are interested in purchasing this album, please visit my Etsy shop where you can purchase the download for $10. Good Luck, everyone!Thanks for stopping by!

Friday, September 20, 2013

FREE Printable: Spooky Halloween Banner

Hello everyone! I wanted to share with you this Halloween banner I made...and I'm giving it to you for FREE (my favorite "F" word)!!!! Here's the banner...I'm not too sure where I'm going to officially hang it yet, but I have about a week until I will start decorating for Halloween so hopefully by then I'll figure it out.


I printed mine out on brown/cardboard looking card stock that I had on hand. I bought a 50 sheet pack from Michael's awhile back. I used my crop-a-dile to punch holes on each side of the banner pieces and strung them up with black ribbon. And you know me, I inked my edges even more...I love the grungy look...especially for HALLOWEEN! This banner can be printed on any color paper you want or you could also print it on white and you could glimmer mist it, which would look pretty cool. 

Now you can download your copy of the printable PDF by clicking HERE. Have fun with it! And as always, thanks for stopping by!