Showing posts with label ribbon. Show all posts

Sunday, January 24, 2016

DIY Coffee Filter Wreath

HELLO! It has been FOR-EV-ER! I miss you guys! Life has once again gotten away from me and here we are almost a year since I last updated. I promise to not let so much time pass before I post again. Came up with a super easy and cute Valentine's Day decoration. Check it out below and enjoy!


Thanks for stopping by!

Thursday, January 9, 2014

DIY No-Sew Lamp Shade

Here's a new video of a lamp shade my mom asked me to makeover for her. All I used was her lamp shade, burlap, ribbon, scissors, hot glue and gun (and wire because her lamp shade was in 2 parts).


Hope you guys like this. Let me know how yours turns out!
Thanks for stopping by!

Sunday, September 29, 2013

Pinspiration Sunday: Upcycled Book into Pumpkin


Since my best friend, Angela, and I raided a yard sale scooping up a ton of old Reader’s Digest books, I’ve been looking for projects I could do with them. Making a pumpkin seemed like a really great idea…at the time….I only say that because it’s a long tedious project. Just like my recycled book into keepsake box, this involves a lot of time cutting pages with an xacto knife.
Well anyways…let’s get started, shall we? First things first gather your supplies

I used:
Old Reader’s Digest book
Pattern from BHG—cut out
Valspar's La Fonda Copper Spray Paint
Acrylic Spray Sealant
Cinnamon stick
Burlap
Tattered Angel’s Glimmer mist
Lace/ribbon
Hot glue and gun

First I removed the cover and binding from my book (and put it away for safe keeping so I could do something with it later on). 


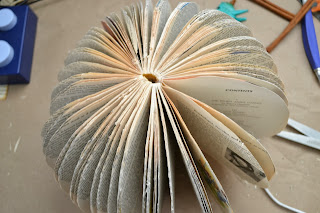
Next put my pattern on the book, traced it and started cutting away…this takes FOREVER…and with my RA, it didn’t feel so good on my wrist…but after awhile (for me I did it in stages over many days) you cut through all the pages and you have something that looks like this:


Now it’s time to start hot gluing pages. First, you want to glue the first and last pages together to make the pumpkin fully round. Next, you take a strip of hot glue along the binding, top to bottom, throughout the book. This helps separate the pages a little to make the pumpkin fuller. 

Space between the first and last page--glue these together

Start gluing between pages at the binding--make it full all the way around---fill in gaps

After, I did this, I sprayed the entire thing with my orange spray paint. I tried to separate pages so that the color would get on the inside as well…I was covered in paint by the end but the pumpkin looked good. I let that dry overnight. Then I carefully separated any pages that got stuck together from the paint and I added more hot glue along the binding to help separate pages as needed. Then I sprayed the pumpkin with my acrylic sealer. After that dried it was time to add the finishing touches. 


I took a cinnamon stick and broke it in half, and stuck one half in the center opening of the pumpkin top. I had some burlap leaves on hand that I made up a while ago using mod podged burlap and Tim Holt’s tattered leaves sizzix die. My leaves were in neutral colors so I decided to glimmer mist it using Tattered Angels leapfrog glimmer mist.


 Once that dried (I hurried it along with my heating tool), I hot glued it into place. I finished it off with a piece of lace ribbon that I tied around the pumpkin’s stem.


And there you have it…a pumpkin upcycled from a book! Hope you enjoyed this tutorial! Thanks for stopping by!


Friday, September 20, 2013

FREE Printable: Spooky Halloween Banner

Hello everyone! I wanted to share with you this Halloween banner I made...and I'm giving it to you for FREE (my favorite "F" word)!!!! Here's the banner...I'm not too sure where I'm going to officially hang it yet, but I have about a week until I will start decorating for Halloween so hopefully by then I'll figure it out.


I printed mine out on brown/cardboard looking card stock that I had on hand. I bought a 50 sheet pack from Michael's awhile back. I used my crop-a-dile to punch holes on each side of the banner pieces and strung them up with black ribbon. And you know me, I inked my edges even more...I love the grungy look...especially for HALLOWEEN! This banner can be printed on any color paper you want or you could also print it on white and you could glimmer mist it, which would look pretty cool. 

Now you can download your copy of the printable PDF by clicking HERE. Have fun with it! And as always, thanks for stopping by!


Sunday, February 10, 2013

Pinspiration Sunday: 52 Reasons Valentine's Day Gift

With Valentine's Day just around the corner, I thought I would share what I made for my husband this year. I had originally got this idea years ago after Googling Homemade Valentine's gifts. Then I thought about making it this year and decided to search Pinterest for ideas. I came across this photo.
My hubby likes robots...A LOT..and so I decided that I wanted to do a cover similar to this one. I went searching the web to find just the right image I could use. There are TONS of images out there. I was shocked and amazed by the variety. I finally decided on a Photobucket image called Robots in Love. It was simple and cute and the image was long instead of wide which worked well for me because I wanted my book to open from side to side instead of bottom to top. Then it was time to gather supplies. Here is a list of things I used to make my book:

Full Deck of cards (I bought a Breast Cancer awareness deck which had pink instead of red...which I just LOVED!)
sand paper
Tim Holtz paper distressor
crop-a-dile
binding rings
ribbon
ink in red and black
burlap
ATG adhesive gun
and 52 reasons why you love someone

I bought my deck of cards but I wanted it to look old and used, so I took each card and distressed the edges with the Tim Holtz Paper Distressor. Next I used the sand paper and sanded both sides of each card. Then I took a couple cards at a time and punched holes on one side for the binding. I would use one of the cards already punched to line up another stack of cards. I repeated this until all cards had holes. Next I put the binding rings on and cut some small pieces of black ribbon and tied them to the binding rings for decoration. Then it was time to decorate the rest of the book. I used the Joker cards as my cover pages. I used the ATG gun to adhere the burlap to the front and back. I used the image and added text in Microsoft Word to make my cover. I just printed it out and tore around the edges. (It took several tries until I got the font size right so it would fit on the cards) I also typed out my reasons on Word. I inserted a table with 4 columns and 3 rows. I centered the text using the font Minya Nouvelle in size 18. I then tore out each reason. I inked the edges of the ones I used one the black cards with red and black ink on the pink cards. I used the ATG gun to attach the reasons to the cards. Here's some pictures of the finished project:


Sunday, December 9, 2012

Pinspiration Sunday: Christmas Wrapping

This year I found a new way to wrap gifts for Christmas on Pinterest. Just use brown packaging paper and some ribbon and stamps. I love this amazingly simple and clean look! This is my original pin from The Haystack Needle:


This is what mine look like:


The paper I bought from Amazon. It was about $26 and it is a HUGE roll. If you would like to check it out you can find it here.The ribbon I bought at Michael's clearanced for $1.99 a roll. And the stamps I also bought at Michael's. They were originally $9.99 but on sale for 40% off.

And then I found this idea:


As soon as I saw the above photo on Pinterest I did the “pin now and look at it later” and started saving my toilet paper rolls. But then when I went back to look at it, it went a video which does not show you how to make them. Just shows ones made. Not too much of a worry for me because as I’ve said in the past, I like to figure things out on my own. This toilet paper roll gift boxes work great with this look. I didn’t need to do any decorating to them. But you could always cover with scrapbook paper prior to getting started. Here’s how I made mine. First I flattened the roll out.


Next I grabbed a ribbon roll and placed it at the end of the roll and scored the outer edge to make a curve. I did this on front and back and both ends. Using the ribbon roll allowed me to line up and make consistent score marks.


Then you fold in along the score marks to make the box close on each end.


My plan was to use these for gift cards. Unfortunately I did not measure the gift card to the toilet paper roll. What I found was the cards were too big to fit inside.


Not a problem…I’ll start again. This time I just free-handed the score marks and hoped they turned out okay...and guess what?!?!?! They did!


Next I stamped the name on the front. Placed the gift card inside and tied some small red ribbon around it.


Perfection! And cheap!!!!

Thursday, December 22, 2011

Christmas Memory Box

I made this box after watching Marion Smith's video for her Travel book box. I decided to make a Christmas box instead. I thought it would be a nice way to document the holiday season and what better year to start it than the year we started our family. Here's a look at the box and 1st book I made:


And what makes it even more perfect is my "push" present. (in case you have no idea what that is, it's the present my husband gave me for pushing out our baby boy)He got me the new polaroid camera and the pictures are the perfect size for the mini books that go inside


So there it is. I can't wait to doodle and journal in it. I'll show you the finished product later!