Showing posts with label spray paint. Show all posts

Sunday, September 14, 2014

Pinspiration Sunday: DIY Mobile

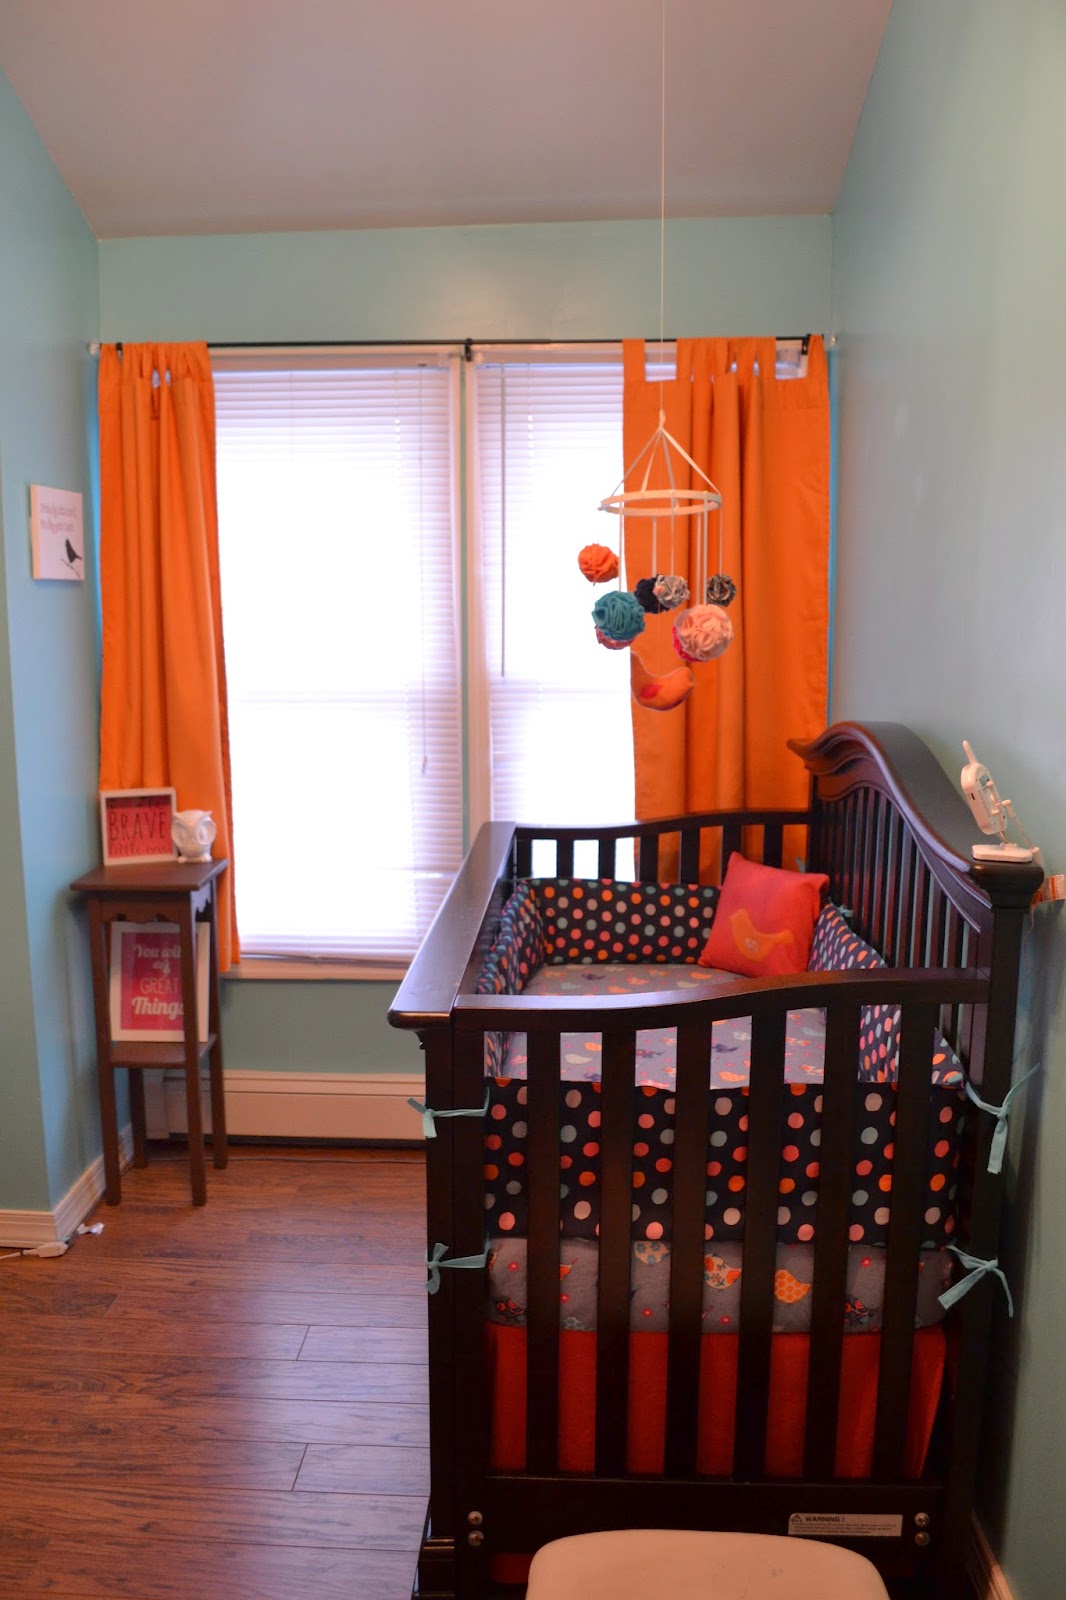
Are you tired of nursery DIY tutorials? Me neither! So here's another one...DIY mobile.


My inspiration came from this picture on Pinterest from an Etsy Shop called  Marigold Poms.

I could make something like this

Here's how I made mine...

Supplies:
Embroidery hoop (I used a 12in)
ribbon/string
fabric in varying colors
corks
hot glue
pins

OPTIONAL:
spray paint (I used a cream color)
Bird (which I made)
sewing machine
matching thread

First things first you have to make your pom poms. I used different types of fabric which included cottons, fleece and felt. I cut out a bunch of circles for each fabric.


Next, instead of buying Styrofoam balls, I decided to use corks, which I have a ton of (saving them for some other project I might get around to doing someday). I cut them in half. 


Here's a video to show you exactly how I assembled them.


Next, I wanted to incorporate a bird into the mobile. I used the fabric bird tutorial I found on Lavender's Blue Designs . You can click over to her page for the pattern and follow her directions from there. I also took pictures along the way to show you the process. 


After you print and cut out the FREE pattern, you can trace each piece onto the fabric you plan to use. You will trace and cut out 2 bird shapes and 2 wing shapes but only 1 bottom.


Next, I used an overcasting stitch to attach one wing to each bird. 


Then, with the right sides of the two birds facing each other, sew along the top of the bird from the beak to the tail .


No you want to start on the bottom. Remember, the right sides of the fabric should face each other. Pin along the edge and sew, first one side then the other.


Now that it's sewn, turn it right side out.


Now it's time to stuff it. I used the stuffing from an old toy my son no longer plays with. Once you've stuffed it, you want to sew the tail. And you should get something like this.


For the embrodiery hoop, I spray painted mine a cream color and allowed it to dry completely.


Next I used ribbon to attach the pom poms I made and enough to hang the mobile. It goes something like this


I used orange thread that was quadrupled up to attach the bird which was tied into the middle knot of the ribbon seen in the middle of the hoop. Then I used a thicker string to hang the mobile from the ceiling.


Sunday, October 13, 2013

Pinspiration Sunday: Dresser Makeover

I’ve been wanting a new dresser for a very long time now. The dresser I had was from my Aunt and who knows how old it was…but that I got passed to my son when  he got too big for his changing table (we put the changing pad on top of the low dresser…works amazingly!) and I have his baby dresser/wardrobe. After we madeover our bedroom a few months back I wanted something that would fit in well with our new look. I searched online but just didn’t find what I wanted and if I did like it, it was way out of my price range. So I took to the thrift stores and hunted through yard sales…and one day I found this for $60!


But that was not going to fit into our new room…but after looking on Pinterest, I found a tutorial over at Adventures of a Middle Sister and decided that’s what I was going to do with mine. Now my dresser looks like this:


Here’s how I did it…

Supplies I used:
Electric sander
Medium and low grade sandpaper
Sanding block
Paint of your choice
Rollers/brushes
Sealant
Drawer handles/pulls
Spray paint and sealant
Electric screw driver
Drill bit
Screws
Wood
Stain

 First I sanded the entire outer surface with my electric sander. First I used a medium grit paper then a fine grit sand paper. Then cleaned off any dust.


Then I started painting it. I used a white, oil-based paint for outdoor doors, hoping that this will withstand some wear and trying to avoid priming it first. I put 2 coats on with 24 hrs of drying time in between. 


Next, I took my sanding block and removed the paint along the corners of the entire thing. I love that distressed look, but I didn't want to go too wild.


Then it was time to work on the top. I wanted to incorporate the gray from our bedroom color into this piece. I was orginally going to use wood from an old pallet that has been sitting outside, but with my RA, breaking it apart became quite difficult so I decided just to go by some wood at Lowe's. My husband offered to cut it to the size I needed to cover the top. There was a about an inch or so left in the back, so instead of cutting a strip to fit, I used the ends of the previous cut pieces. This is perfect to give a little back edge. My dresser will be pushed up against a wall with a register at the bottom so the dresser doesn't actually touch the wall and things often fall off the back...so annoying...but now I don't have to worry about that. I sanded the sides that would be stained...and look...they are ready for Halloween!


 I stained the wood using a stain from Lowe's. The color was driftwood. After the stain dried for 24 hrs (I used 2 coats), I set them into place.


Using a electric drill and drill bit, I placed my holes for my screws (one on each end...so 2 per piece of wood). Then screwed in all my nails.
Then it was time for the hardware. I bought new ones from Lowe's...some cheap ones (I'm not too picky) and I spray painted them orange (Valspar's La Fonda Copper) to match the rest of the orange stuff throughout our bedroom. I left them dry for 24hs, then sprayed them with an acrylic sealer and allowed that to dry overnight.

The box is already orange because I used it when I sprayed my book pumpkin from the last tutorial


While those were drying, I applied a furniture sealant for light color wood called polycrylic. I allowed the first coat to dry, then lightly sanded it with the sanding block, wiped clean and then applied another coat of sealant. I allowed that to dry for several hours. Then I placed the drawers back in just to free up some room in the garage until it was fully dry after 24hrs.


And there you have it....a thrift store dresser makeover. Hope you liked this tutorial and it inspires you to get crafty! Thanks for stopping by!


Sunday, September 15, 2013

Pinspiration Sunday: Plastic Drawer Re-do


I found this pin to re-do a plastic drawer stand. I've had this pink plastic drawer since I was in college. It in no way goes with anything in our house. So this was the perfect opportunity to make it fit. Here's what I started with. 


The fronts are actually covered by card envelopes with my name on them. As you can see...the top one had something in the drawer that leaked at one time...did I swap it out? Nope! But that's okay, I'm making it up for it now.

Here's how I started mine. First I took out the drawers. Then I wiped the entire pink section down (it was pretty gross with caked on dust :^/). Next, I sanded over a few areas that were scratched and wiped the dust away. Then I sprayed the entire thing down with Valspar's Plastic Primer which I purchased from Lowe's for about $5. And I allowed that to dry completely.


Next I took my pretty in pink drawer stand out to our concrete slab, put some plastic under it and sprayed it with that beautiful La Fonda Copper by Valspar spray paint I used on my thrift store finds seen here. I gave it 2 coats and allowed it to completely dry in between. 


Next, it was time for the drawers. They had to be emptied and wiped down as well. Then I taped off the front with paper and masking tape. 


Then I sprayed it with the plastic primer and after it dried I sprayed all the outside of the drawers with white spray paint. I allowed that to dry over night. The next day I sprayed them with a sealant and again allowed it to dry completely. Then I removed the tape and paper.


Now it was time for the paper. I bought some digital paper awhile back and I used one from that to make these drawer covers. I printed out 3 sheets. Next I applied Mod Podge to the inside front of the drawers like this:


Then I pressed and smoothed the paper to the drawer front


I allowed them to dry completely. Then I cut the excess paper off the top. I finished off by applying another coat of mod podge to the back of the paper. Here's the finished project again.


 I would recommend using a lighter colored paper to decorate the drawers. As you can see in mine there are a few areas that appear lighter because the mod podge wasn't as thick there so it pulled a little bit away from the drawer. After mine turned out like this, I took a closer look at the original pin (seen below) and realized the same thing happened on that one. But I still like the way it turned out. A much greater improvement from the beginning.

Here's the original drawer re-do from Simply Living that I saw on Pinterest:


Hope you enjoyed this makeover. If you try this project out, let me know how yours turned out! Thank you so much for stopping by.


Sunday, July 28, 2013

Pinspiration Sunday: Lacey Table Top


I bought a coffee table last summer from a yard sale for $10. I bought it knowing that I wanted to re-do it. It has this inlet that I was planning to fill in with tile or something…however, my lil’ tot likes using this table to hold his snacks….and my husband liked it too. So on to plan B. I got this idea from the ladies over at A Beautiful Mess…once again, I’m in love with their creativity! But this table having the center set down in made it a little tricky…but I think it turned out okay anyways. 

Here’s what I used:
Wooden coffee table ($10 yard sale find)
Electric sander (already owned)
Windex and paper towels (cleaning supplies)
White primer
2 different sized paint brushes and a small paint roller
Cream colored spray paint (got at Lowe’s for less than $4)
Brown latex paint (had from when we moved into our house and painted)
Sealant (already had from other projects)
Tape
Lace (25 cents from yard sale)


So first thing first….time to sand this table down…well at least the parts that could fit the sander.

Then I cleaned it with Windex and paper towels…somewhere on the internet I read that you should clean it with Windex.


Next I primed the entire table and allowed it to dry.


Then I painted just the inside top brown and allowed it to dry.

Then it was time for the lace…it was hard to pull the lace taught so I had to not only tape around the top edge but I had to make doughnuts along the inside edge to keep the lace as close to the surface I wanted painted. 

Then I spray painted over the entire lace covered area.


 I took the lace off immediately after I sprayed so that it wouldn’t stick to the table.
When you look closer at the table you can see that the edges are kind of fuzzy…like out of focus, that’s because the lace wasn't as close to the table surface…but I kind of like that effect.


Next came time to paint the rest of the table.  I used a roller for most of it to get a nice, smooth, even finish. I used a small brush in the corners and in areas where there were gaps in the wood pieces.

I allowed it to dry overnight. The next morning I applied a spray sealant and allowed that to dry…and it was done!


As always, thank you so much for stopping by!