Thursday, July 21, 2011
Baby on Board
Well it's been a REALLY long time since I've posted and I was trying to be better at this. Well my life has changed A LOT since my last post. I changed jobs, found a place closer to home without having to be on call so that has made it nice. I also found out that I'm pregnant with our first child! At this point I'm in my 21st week... I haven't done much crafting since I found out and therefore have had nothing to post. I'm doing pretty good at this stage in my pregnancy that I'm definately gonna get back to work in my craft room. I started working on a baby album for the little guy growing inside me. That's right...it's a BOY! His name will be Albert Grayson and we are going to call him Grayson. My fist album, since I am a sonographer, will be ultrasound pictures of him as he has been growing. I'm gonna call the album Albert Grayson: From the womb to the world. I will post pics as I work on it and see if I can give you any tips or ideas along the way. I also need to finish up my PIF gifts...I have only one left and although I started it I really need to get busy on it and finish it up. It's for my best friend (which I thought would make it easier but it's really not)so I really want it to be prefect! Just thought I would share what's been going on in my world and let you know that I have not given up on this blog. I will still continue to write and share. Thanks for reading!
Saturday, March 12, 2011
Owl Glimmer Chip
So I thought I would share some new items I got…I’ve been shopping online at yourmemorieshere.com and marionsmithdesigns.com to get craft goodies… I filled a shelf with tattered angels’glimmer mists that I’m so excited about. I got a great deal from Marion’s website…

I bought these nature embossed glimmer chips made by tattered angels from your memories here…they are so cute…
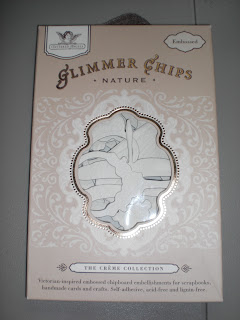
I thought I would share one I made…This owl is adorable and I have a great idea for it for on a mini album…

I first mixed brown and vanilla craft paint together and lightly painted over the entire chip. After it dried I dry brushed Robin’s egg blue craft paint over it to highlight the embossed areas. Then I sprayed the chip with Wheatfields glimmer mist and dried it with my heat tool. Finally I sealed it with gloss mod podge. Here’s the finished chip…I love it! I hope you do too!

Friday, February 25, 2011
3rd one done
I just finished my 3rd "Pay It Forward" gifts. This one is for my friend Colleen. We became friends in college after being roommates towards the end of my freshman year at Bloom. I left some pages blank so that she could add in somethings. I used an $1 chipboard album I bought at Michael's but added regular square straight edge chipboard for the front and back covers. I also used a Bo Bunny paper collection to help tie the album together. Here's the pics...
Front Cover


Back Cover

Front Cover


Back Cover

Sunday, January 23, 2011
My Craft Room
I wanted to share my new craft room...I was so excited to move downstairs...My old room was shaped awkwardly and there wasn't much room for shelves to hang on the wall...I have so much more storage in my new room and I am able to get a big table in the room so I have a better work space..
This was my old room (didn't keep it this messy we started to move stuff out already) Oh and see that itty bitty table in the left corner? Yeah, that was my work table...I usually ended up working on the floor...

Here's Albert putting up the shelves in the closet


Got the new table in...

So here's the pics of my new craft room.
The cherry cabinet holds scrapbooks and Cricut cartridges which I purchased at a yardsale for $10...The shelf above it was also from a yardsale (free) which holds some odds and ends. Next to the shelf is a Birthday gift from my Aunt Cindy. It's a wrapping paper organizer but I used it for ribbon and some other accessories. Below that is my paper and sticker stand.
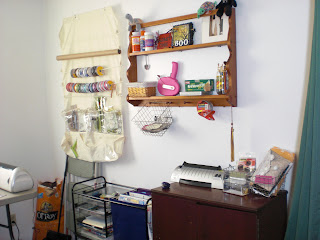
This is my new 6 foot table I got for my birthday. I have so much room to work now! I love it! I have a power strip to plug in any tools I may need and surronding the table are lots of accessories...I have a basket full of scissors, buttons, flowers, brads and eyelets in canisters on the magnet board. And the shelves (one from a thrift store, the other from a yardsale) holds my glues, glimmer mists, ink pads, and others odds and ends. Be;ow the table are laces, a trash bad, plain boxes that I will decorate to put up on etsy...

This is my computer stand...nothing really exciting there.

This is my closet...my hubby bought me the shelves and put them up for my birthday...I have lots of goodies in those bags and boxes...Tim Holtz grunge board fills a bag, lots of glue dots fills another, cut outs, paints, floral accessories etc.

And finally the enterance to my crafty cave :)

Thursday, January 20, 2011
At Last, I'm Done....Well Almost
I finally finished up my Halloween mini...just about anyways...I just need to order the pics to go inside...This was my first ever Halloween mini...I think it turned out pretty cool...I played around with a lot of techniques that I learned from Marion Smith and it finally came together...I put pockets and photo mats and places to journal. I've never journaled in my scrapbooks before so I'm gonna try it out in this one. Here's the rest of the album (minus the pics from Halloween), If you missed the first portion of the Halloween mini its a few journal entries prior to this...enjoy...


The End.


The End.

Sunday, January 16, 2011
Another One Bites the Dust
Well I've been a crafty mood lately and worked on my second Pay It Forward Gift...only 2 more to go. But I think before I get started on those I need to finish my Halloween mini...I put that off for way too long....so we'll see...but here's pics of my mini I made for PIF2011...I put lots of tags in it so that she can journal and put pics in it. And I tried not to decorate it too much so that she could add herself and herstyle to it....I hope she likes it!
The front cover


The End.

The front cover


The End.

Sunday, January 9, 2011
First one done
Well I'm pretty tired of trying to find a home for all my craft stuff...so instead I got started on my Pay It Forward gifts....I made it from an Altoids tin...I cut a piece of burlap and hot glued it to the front. I used the UTEE technique that I learned from Marion Smith to make the letter "F" and stickers for the rest of the word family. I used glimmer mists on the flower and cut apart some Christmas pics for the balls. Then I copied a quote and put inside and included a pic of the family. (I didn't post that b/c I don't know if she'll read this and I want her to be surprised) Hope you like it!


Subscribe to:
Posts (Atom)