Sunday, July 11, 2010

Lomo Action Sampler

The Lomography website had a sale on some of their merchandise about a week and a half ago. I bought some film and I bought another camera. This is a 35mm camera that has 4 lenses. It’s called an action sampler. They actually make them with 6 and 9 lenses but this one was cheap ($20) so I went with this one. Unfortunately, I have a lot to learn about this camera too. Only about 10 images actually are visible but luckily the camera came with a roll of film so I’m not too upset that it was kind of a waste of 36 exposures. What I learned from this first run with Boing (that’s what I call it because it was labeled the “football” style camera…it says “Boing” on it and the “o” is a soccer ball) is that aim is important, lots of light is important and, of course, movement is important. Some of my images kind of cut off what I was trying to focus on. And my indoor pictures are not distinguishable and if there is no movement, then its just the same 4 images. What I liked about the images were some pretty colors. Some of them were just so blue…one of the reasons I like lomo cameras is the way an image can be saturated with a color with or without a color flash. I’m working with Diana still…I’m trying to find out where I can get 120 film developed without being so costly….I’ll be sure to update on that…for now enjoy some of the images I got with BOING!


Thursday, July 8, 2010

Custom Framing

Here’s an easy way to decorate with your very own personal touch…make your own frame! All you need is :
~cardboard
~scissors
~glue stick
~tape
~scrapbook paper
~embellishments
~ruler
~pencil
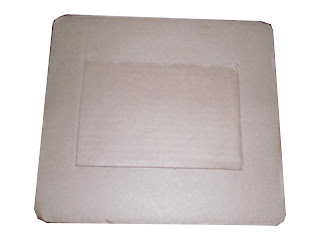
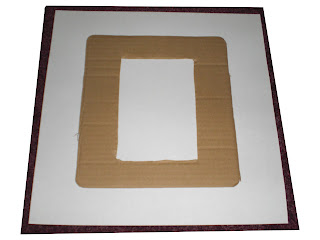
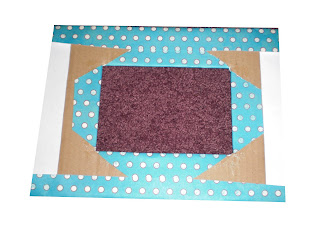
First I started by finding a piece of cardboard that I could use. It was already just the perfect size so I just went with it. You may need to cut yours to a suitable size. If so, do that. Next, my picture I wanted to frame was a 4X6 picture so I needed the frame opening to be slightly smaller than that so I used my ruler and pencil to mark the size I wanted. Then I cut it out. I then placed that in the center of the cardboard piece that I want to use as my frame and traced it with the pencil.


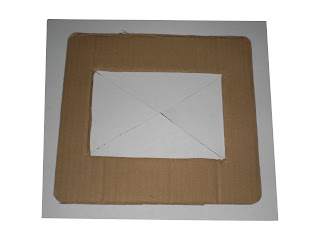
Next I used my cutter bee scissors to cut an “X” in the center of the box I just made. You may need to use an exacto knife if you don’t have scissors with a sharp tip. This makes 4 triangle with one edge still attached to the frame cardboard.


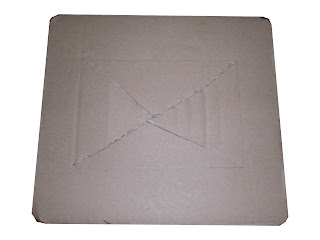
From there I cut the edges attached off.


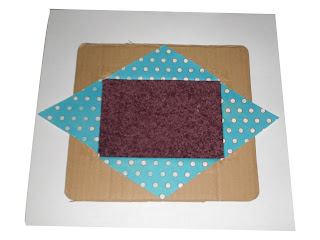
Then I used a glue stick and covered one side of the frame with it, and firmly pressed it onto the back of the scrapbook paper I was using and made sure it was thoroughly attached.


Next I used my cutter bee scissors to cut an “X” in the center of the box I just made. Again, you may need to use an exacto knife if you don’t have scissors with a sharp tip. This makes 4 triangle with one edge still attached to the paper.


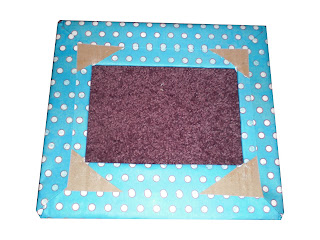
Next I used the glue stick to apply glue on these triangles and folded them back over the frame making the frame center open.


Next I cut off excess paper


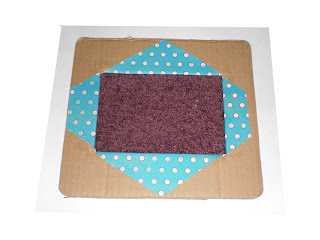
Then I folded the paper from around the outside of the frame towards the back and secured with the glue from the glue stick. I started with opposite sides so then I could make the edges smoother as they could be folded like a present.


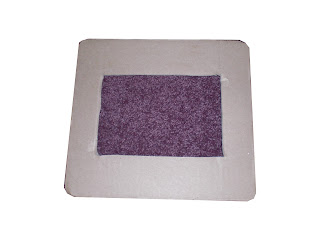
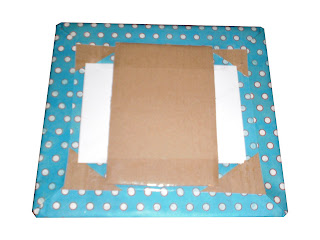
Next I attached the back of the picture I am using to the cardboard I used to trace the center of the frame. This provided a solid back for the image. I secured it with tape.


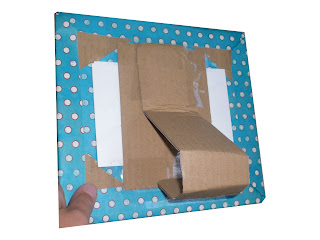
Then I took excess cardboard and made a stand by taping it to the back and folding it to secure it at a position that would support the frame.


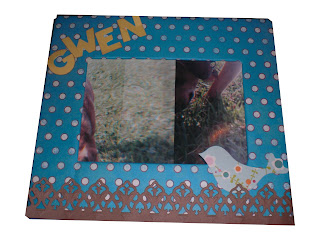
Then it’s ready for embellishments! Have fun with it!

Saturday, June 26, 2010

Diana Has Arrived

So as I talked about in one of my earlier posts, I discovered the world of Lomography and was hoping to one day buy the Diana f+ film camera. Well my dream has come true! I received my camera a few days ago…and well…it’s been interesting. This camera feels so fragile, and it is. It is almost 100% made from plastic. And loading film, can you believe I had to read how to load it???? I just couldn’t remember. And you don’t get to see how you focus. You basically judge about how far you are away from the subject you are imaging, set that distance to one of the 3 range options and point and click and hope for the best. My first roll of film was not the best turn out. I put on the 35mm back and set it to take normal rectangular pictures, but mistakenly put in a panoramic mask. So what that meant was when doing panoramic shots you only get 27 exposures and with normal you can get as many as 36 (which is the film I had) so that meant that my images overlapped each other. Nonetheless some images actually turned out to be pretty neat lookin’. For my next to rolls of film, I discovered my error from the first roll and so the overlapping was gone. My problem now is learning to be still while taking pinhole images (you need the shutter open longer to let enough light in with the very tiny opening). This caused a lot of blurry images…but again some looked really neat and others, well, not so much. But I’m learning. I started with the 35mm film figuring it would be cheaper to use. I’m anxious to get the 120mm film which is what the camera was really designed to work with. The best thing about the 120 film is that it produces vignettes which I absolutely love! When I get that film and start working with it I’ll let you know how it turns out…but for now I gotta get back out there and shoot some more…

Here's my favorite image from my first roll of film:


And here's another that I really liked from the first roll:


Here are more from my other rolls:


Monday, May 24, 2010

Create Your Own Art Work


So here's an affordable way to get the artwork that you want in your home. I love the country signs that have cute sayings but I just couldn't find one that would fit in our kitchen. I like the say “Good food, good friends, good times." In fact the saying "good times" is something my husband and I use A LOT. So I really wanted to have a sign with that saying on it. Now my kitchen is this amazing blue color (well I think its amazing) and I have accents of brown, tan and orange. Needless to say I couldn't find those colors in a sign so I took it upon myself to make my own. I went to a local craft store to get supplies. I first went to the scrapbooking section to find paper to use as the background. I found this awesome orange paper that had fluffy white flowers and grabbed two of those. Next I headed to the frame department and found a frame that I liked and I was able to use a coupon on it so I got it for half price. I already had cardstock at home for the lettering. I simply tried to line up the two sheets of paper the best I could to cover up the fact that there were 2 separate sheets instead of one solid background. Cut it the size of the frame. Then I cut out the saying using my Cricut© machine with the Jasmine font. Then I simply glued them in place. After letting it dry I just placed it in the frame. Then I bought some cheap berry garland and draped it around the frame. And there you have it. Total cost was about $15. And it’s custom made!

Tuesday, May 4, 2010

Flower Pots

So I should be studying for my Abdomen board exam but instead I’m doing this. I’m trying to grow flowers from seeds but I’m not having much luck keeping them alive and there is still a chance of frost so I’m afraid to plant them outside but they’ve are grown enough to not be in the starter kit that I bought. Unfortunately I don’t have flower pots or the money to go buy some up so I needed to come up with something that not only could allow the plants to further grow indoors but also look nice as it would be displayed in the house. That is where I decided to make mini flower pots out of stuff I have around the house. I will show you this very simple and pretty way to make a small pot from a tin can. You could really use anything like plastic bottles or bowls too. The supplies you will need include: Mod Podge, scissors, foam brush, scrapbook paper, ribbon, paper trimmer, and the item you wish to plant in (i.e. tin can, soda bottle, cool whip bowl) I also had pliers to push down a part of the can that was sticking up inside to avoid cutting myself as I placed the soil into the can.


First I took the label off the can.


Next I measured the height of the can and cut my scrapbook paper accordingly (I used a scrap piece of 12X12 paper and cut to the height needed).


Then I covered the entire outside of the can with Mod Podge.


Next I wrapped the paper around the can.


Cut off the excess paper leaving some extra and applied the Mod Podge to that and pressed down to secure.


I gave the can a little time to dry before I applied the Mod Podge around the entire outside of the can again, over the paper. This will help it resist water should you spill any as you water the plant. Next I tied a scrap piece of ribbon around the can while the Mod Podge was still wet. Then I allowed it to dry.


Finally I filled it with soil and planted the flower…and that was it. It was really very simple. Happy growing!

Tuesday, April 20, 2010

Boxing

I posted pictures of my boxes that I’ve been making on Facebook and they are selling like hot cakes. Within a half hour of putting the pictures up I already had 4 requests. I’m pretty excited about that. I’ve been busy making them up. But unfortunately the store where I buy the unfinished boxes is currently out of the recipe box so I’m kind of on hold until they get more in. I tried looking on line for a wholesale place but I just can’t seem to find the boxes that I want and if I do, the price is not feasible. So we’ll see…for right now I’m enjoying this success…hopefully it doesn’t end as quick as it started…

Here's some that I've done, some were requested schemes others I just did:


Saturday, April 17, 2010

Chocolate & Crafts

Today I went to a church event where the women of the church were able to eat yummy foods dipped in chocolate and enjoy crafty ideas. I actually was there to walk them through making a card. I had a lot of fun. It was a very simple card but it was great to see everybody's creativity when they did their own cards...it really was a great time. I even got asked to make a custom designed box...my first sale! I'm so excited. I've been working really hard on these boxes and I'm glad that someone other than me appreciates them. It was hard trying to think of prices because I work so hard on them, what is the price for someone’s creativity???? Well for me, it ranges between $10-$15 LOL! Anyways, they asked me to help out in the Fall for another event so now I’m busy trying to think of something to do then….we’ll see what I come up with...